Skirting the electrical wiring
Skirting board
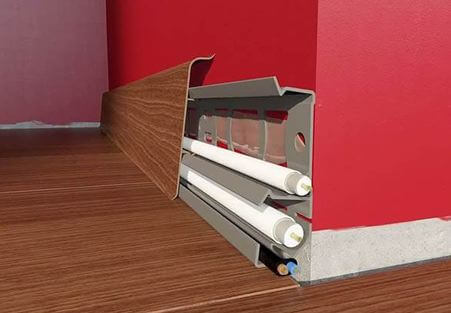
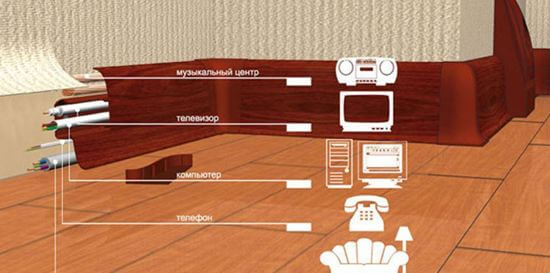
By design, the electrical skirting boards are similar to each other: they consist of a plate that is attached to the wall, cavity or shelves where the cable is laid, and the front panel. But there are such models that contain only one recess, where 3-5 cables lie. The outer panel is a protective plate that rests on the latches, that is, you fasten it without tools.
It is possible to lay wiring in the electrical plinth not only in the apartment, but also in the country or in a wooden house. This is because the installation is quick, convenient and cost-effective, while the electrical wiring will be hidden from prying eyes.
Installation technology
Before starting work, it is necessary to carefully think through everything and carry out preparatory work. First of all, you should decide where the wiring will take place. When planning, the total cable length should be calculated.
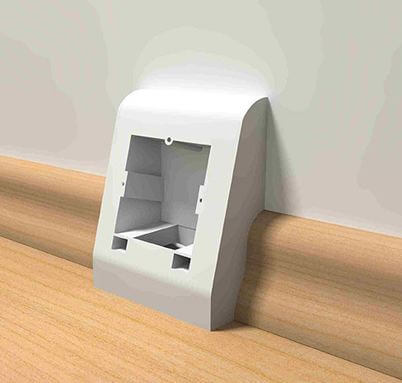
The next stage is the purchase of all necessary materials for wiring. Please note that if you plan to install additional outlets, you must purchase a special box for installing electrical products in the baseboard, as shown in the photo below. Or you can use the cable channel to raise the wiring up and install a patch outlet.
Then you can proceed with the installation. To do this, you must:
- Remove the old unsuitable baseboard.
- Remove the cover plate of the box. Only the installation bar should remain, with which further work will be carried out.
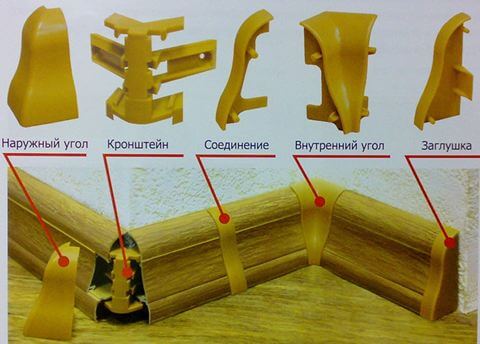
- From the inner corner, begin the installation of the mount. Put the corner adapter on the end of the bar. And in the place where the wiring is planned, attach the bar.
- With the help of an awl, it is necessary to make punctures for fastening. At the same time, the marks on the wall should be small.
- Then the skirting board is removed, and with the help of a puncher, holes with a diameter of 6 mm are made into which dowels are inserted.
- The adjusting plate comes back into place and is screwed on with self-tapping screws.
- With the help of special adapters, the skirting board is attached to the frame.
- Once the bar has been installed, you can proceed with the installation of the wiring. To do this, all wires are placed in special cable channels or on shelves.If necessary, the wires are additionally fixed with mechanical fasteners.
- Where the rosettes should be, holes are made. To avoid damage to the insulation, clean the edges with a file. The next step is installation of sockets and their fixation.
- After wiring, reinstall the front panel.
The video clearly demonstrates how to conduct wiring in the skirting board with your own hands:
Advantages and disadvantages of installation
The electrical wiring in skirting boards has its advantages and disadvantages. The main advantages include:
- This installation method is permitted according to chapter. 2.1 PUE Clause 2.1.4.
- It is possible to lay an electric cable without damaging the wall cladding and decoration.
- The protected panel on the frame can be easily removed without the use of additional tools. Thanks to this, you can easily and quickly replace damaged wires or carry out wiring audit.
- In the construction market a large selection of these products is provided. Thanks to this, you can choose a skirting board for every taste and wishes. Wires can be located on one shelf or on several.
But in addition to the advantages, the wiring in the baseboard has its drawbacks. The main disadvantages include:
- As a rule, cheap products are made from cheap materials. And as a result, the risk of cracking or damage during installation or operation increases.
- Over time, gaps appear between the electrical box and the floor due to the flexible edges of the structure. Small debris and dust get into them, which is very difficult to remove from there.
- Polymer coatings and materials do not tolerate the effects of ultraviolet rays - they crack and fade.
That's all we wanted to tell you about this method of wiring. Now you know what wiring in baseboards is, how to do it yourself and what are the pros and cons of this option for wiring.
Surely you do not know:

