How to install a floor temperature sensor?
The device and purpose of the temperature sensor
So the temperature sensor for the underfloor heating system is a thermistor protected by a glass flask, and also having a copper conductor about 3 meters long for connection to the thermostat. In addition to a glass bulb for tiled floors, the thermal sensor itself is also protected by a gel shell. The conductor is insulated with high-quality PVC (polyvinyl chloride) in order to protect it from external influences and damage. The length of the conductor can be increased, and naturally reduced, up to 50 meters, the main thing is that there is an intact sensor at the end of the conductor.
For its simple replacement, it is recommended in the future to place this design in a metal-plastic tube, even if the manufacturer provided plastic corrugation with a diameter of 16 mm in the kit. The metal-plastic pipe has a smoother inner surface, so it is much easier to get and install, as well as connect a new temperature sensor, in case of failure. These types of temperature sensors are installed in solid floor coverings (for tiles or porcelain tiles).

Another kind of sensors recommended for laminate flooring, carpet, that is, soft types of floor material, are special plastic cylinders that connect to the end of the electric cable.

The principle of operation of the temperature sensor is very simple, when the temperature changes, its resistance changes, thereby giving a signal to the thermostat to turn on or off the warm floor system from 220 V, the most common network in everyday life.
Installation sequence
We proceed directly to the installation of a warm floor and a temperature sensor. First you need to determine the location of the thermostat, which will be located outside. It is located most often at a height of about 1 meter from the floor. Mounting it is similar to a conventional outlet.
Then you need to make strobes or grooves for laying two plastic pipes. One for the power wire leading to the heating element, the other for the sensor wiring. The tube for the temperature sensor will be located on the floor.Such a laying will make it possible to carry out repair work without removing the tile, at least by replacing the control elements. Replace the heating element completely if it is installed in the screed. It is important that when laying a pipe or corrugation for cable bends and turns be as small as possible. This will further simplify the replacement of a failed temperature sensor.

The video below provides useful advice on installing a floor sensor in the corrugation:
The next step is thermal insulation, it is carried out individually for different types of heating elements, for example, it serves as a damper tape or other insulation, the thickness of which is at least 1.5–2 cm. After this, the heating element is mounted and secured wires to the box of the thermostat.
Installation and connection of a warm floor temperature sensor has its own subtleties. In order to prevent ingress of solution into the tube where the sensor is located, its end located on the floor is sealed securely with tape or tape. It is not recommended to connect the entire system through a power outlet, it is better to power from circuit breaker and through contactor (actuator).

The temperature sensor should be installed at a distance of 0.5 to 1 meter from the wall on which the thermostat is installed, as well as exactly in the middle between two adjacent turns of the heating cable. After installation, it is recommended to fix the temperature sensor with a mounting tape or foil tape.


If produced laying of a film heat-insulated floor, the temperature sensor must be installed under the heater sheet, as shown in the photo below. Note that under the temperature sensor you need to lay insulation, otherwise the heating system will not be effective.

An important point! The location of the temperature sensor must be selected so that it is away from other sources of heating. Otherwise, errors will occur and the warm floor will not work as it should.
The connection diagram of the floor temperature sensor is as follows:


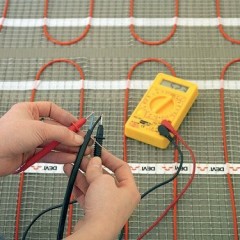
Before doing the screed, you need check the performance of the warm floor and the temperature sensor itself. As a rule, measure the resistance of both elements. The system is considered operational if the resistance differs by no more than 10% from the passport data.

In order for the assembled circuit to be as safe as possible, it is recommended to install in rooms where electric floor heating is carried out residual current circuit breakers, which in case of breakdown will disconnect the circuit from voltage, thereby protecting a person from falling under electric potential. In damp rooms this can be deadly.
We also recommend that you watch a video that demonstrates the main errors when installing the temperature sensor:
Thermostat selection
I would also like to touch on the thermostat itself, which plays a very important key role in this heating system. The following types of temperature controllers for underfloor heating are available:
- Electromechanical. The accuracy of this adjustment is approximate, so achieving a specific set temperature is quite problematic. The main advantage of such an apparatus is its low price.
- Electronic. Installation the set value is performed using touch buttons and has fairly clear settings and the ability to set a limit temperatures up to one degree.
- Programmable electronic. Due to the installation of such an element, you can not only adjust the temperature in the room, but also turn on the heating on schedule, or only if there is a person in the room.
By the way, some thermostats already have a built-in sensor, which makes it possible to control not only the temperature of the floor, but also the air in the room as a whole.
As a result, I would like to recall the rules for working with electrical equipment, all connection work is performed with the power off. At the same time, it is necessary to ensure that no one, except the person performing this work, accidentally applies a strain hazardous to human health and life. This is where our technology for installing a temperature sensor for underfloor heating with our own hands ends. We hope the information provided was useful to you!
It will be interesting to read:


The big question is that the sensor, which would monitor the temperature correctly, looks out of the tube, accordingly it will be filled with tile glue, and accordingly HOW to pull it out in case of replacement, and if you can tear it from the glue, how then will the new one climb into the same place, huh?
1. Or a brass tip is installed at the end of the corrugated tube, and the sensor will be in this tip
2. or the end of the corrugated tube is hermetically sealed with a plug (electrical tape, adhesive tape, etc.) and the sensor will be inside the corrugated tube at its very end.
Hello! a question:
Is it possible to lay a corrugation for the temperature sensor diagonally? those. crossing at a certain angle several turns of the heating cable. The sensor itself will be installed, as it should be, between the turns of the heating cable. it turned out that the temperature regulator will be located far from the warmest floor and, if you do everything at right angles, you will get 2 turns, which will complicate the placement of the sensor in the corrugation = /