How to make grounding in the bathroom
How was it done before
A few decades ago, the issue of creating a grounding circuit was not so important. This was due to the fact that all apartment owners made grounding through metal risers of hot and cold water, which in turn were connected to the ground. As a result of a dangerous situation, the potential went through pipes and there were no problems. However, later many residents of apartment buildings began to replace metal pipes with plastic ones, as they are more practical. As a result, the neighbors from below change the piping, and your grounding in the bathroom loses its functionality, and you, in turn, may become a victim of electric shock.
That is why in Khrushchev it was decided to make the ground loop in another way, which we will discuss below.
Modern installation technique
In old-style apartments, there are several ways to ground the bathroom. The installation of the grounding bus in the common house shield is considered the best, so to speak, the modernization of the power supply system. However, this is extremely difficult to achieve, so some tenants, with the permission of the management company, organize their own ground loop in the basement.
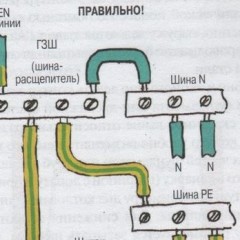
Suppose, in your case, a three-wire wiring to the distribution panel is already connected. All that remains for you make a potential equalization system, which we described in detail in the corresponding article. This system involves combining in the PMC (potential equalization box) grounding conductors from the bath itself, the sink and metal pipes, as shown in the diagram below:

From the PMC, the wire goes to the grounding bus in the shield. As for electrical appliances (boiler, washing machine, heated towel rail, etc.), they must be connected to a grounded power outlet. In the video below, the specialist gives his opinion on this matter:
Additionally need connect an RCD, which will protect the wiring in the bathroom from current leakage. If you nevertheless decide to make a protective circuit in this way, you can avoid electric shock. We will talk about the nuances of installation below.
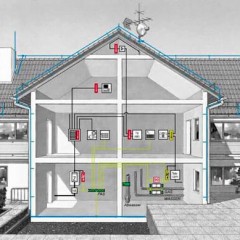
In new buildings, things are much simpler, becausemost often a potential equalization system is already provided, in fact, like a three-wire wiring. Will only ground the bathif it is not already installed, and connect the RCD in the shield.
By the way, you can make the grounding of the bathroom in a private house by analogy with the instructions provided above. Advantage is that perform ground loop installation in this case it is much easier than in the old apartment. We examined all the nuances of the installation work in detail in the article to which we referred.
Connection Nuances
So we come to the main part of the article, in which we consider the features of installing grounding in the bathroom. First of all, I would like to talk about the materials that need to be prepared. So the list is as follows:
- Residual Current Device About, how to choose an RCD, we told in the corresponding article. In short, an RCD of 16A and 10 mA is suitable for an apartment.

- Ground wire. According to requirements PUE Chapter 1.7, the cross section of the copper conductor must be at least 6 mm2, while the insulation color according to the standards should be yellow-green. We recommend using wire PV-1 in order to independently ground the bathtub and other objects.

- PMC. We already talked about her, the photo below shows how she looks.

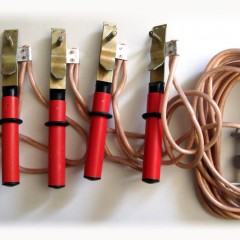
- Clamps so that you can ground the pipes.

Now let's talk in detail about how to make the grounding of the bath, which today can be steel, cast iron or acrylic.
The hardest thing is to ground the old cast-iron bath, because for this you need to drill a hole for the bolt in the case, slightly higher than the leg (see special processes from the case). Next, the wire is pressed by the washer and nut, as shown in the photo below:

In modern cast iron and steel bowls, a special eyelet for grounding is already provided by the manufacturer. The only thing you will need to clean off a little enamel to a metallic color, which will improve electrical contact.
As for acrylic bathtubs, as in previous cases, the manufacturer takes care of his customers and therefore foresees an ear on the frame, to which you need to connect the wire. If there is no eyelet, we drill it with a drill, as mentioned above. Another way is shown in the photo:

Well, the last thing I would like to talk about is the earthing of a hydromassage bathtub. Since it is equipped with electrical equipment, thanks to which the jacuzzi works, you need to seriously approach the issue of installing grounding. As a rule, a device with a hydromassage plugs into an outlet, with which protection is provided (if the wiring is three-wire). In addition, it is recommended to protect yourself by connecting an RCD in the shield, which should work in a dangerous situation.
So we talked about how to make grounding in the bathroom with our own hands, if it is not. We hope that the provided instruction with photo examples was useful and interesting for you!
Related materials: